10 days in Patagonia
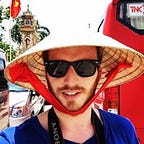
Torres del Paine

TL:DR
- Flight is the most substantial expense
- One can easily do either trek on budget or lux
- The O trek cannot be done during Patagonian summer (Apr-Nov)
- Wonderful and well organized hiking experience
- Paine stands for blue in Tehuelche language (pronounced PIE-nay)
- For inspiration check out my Google Photos album
Summary

I am glad to have convinced a few friends from college back in September to join me on the hike through Torres del Paine. At first it seemed like a crazy idea to book vacation so far in advance yet it turned into a highly rewarding experience. It not only allowed us to relax in pristine nature, challenge ourselves physically, but also it gave us ample time for deep conversations and reflection. All of it while enjoying magnificent and diverse views from the National Park.
Idea
Last fall while trying to satisfy the deep down wanderlust feeling during long and cold evenings I came across a few blog posts about hiking in Patagonia. They presented multiple routes and options but most importantly they all seemed achievable with my limited hiking experience. Without much hesitation I made up my mind to organize it and started exploring it further. One of the goals was not to waste much time traveling between places. I ruled out any major road trips to keep the length of the whole journey to roughly 1.5 weeks. This constraint focused our search on Torres Del Paine and let us ignore other areas such as El Calafate or Tierra del Fuego.
We found that the National Park offered a range of good hiking options. We were intrigued by the O trail as it seemed to be more challenging than the W trail. It covered the W, but also allowed us to explore off-the-beaten sections essentially doubling the hiking distance. The W itself only lasts around 4 days making it much less worthy of a trip to such a remote area. Looking also for a physical challenge, we decided to take on the O.
Getting there
Our group comprised people coming from all over the world (London, NYC, SF), yet we all experienced similarly complicated one-stopover itineraries. Major destinations with the exception of SF have a non-stop flight to Santiago de Chile from where there are multiple daily flights to the closest airport to the park — Punta Arenas. Once there, the journey becomes a little more convoluted as you have to take a bus to Puerto Natales first, and later on to the park itself as there are no direct buses from the airport. Bus schedules are not optimized for the journey from PA which usually means that one needs to stay for one night in PN. Despite the apparent inconvenience it is actually ideal for buying all the necessary camping supplies and renting equipment before setting off for the trail first thing in the morning the next day.
Hiking itinerary

Information available online about Torres del Paine is not nearly on par with the National Park Service in the US, however there is a fair share of blog posts published by many travelers. We based our itinerary on this blog which, with retrospect, could have been a little altered. Wanting to spend as much time as possible in the nature we opted for the 8 day schedule.
Also note that the O trek is more exclusive only allowing 80 people a day while the W trail has a much higher daily limit making it slightly crowded.
Day 1: Central to Serón

The first day proved to be quite difficult for it was quite long (13km) and very sunny. Backpacks full of food did not help to trek for 4 hours in a strong Patagonian sun. We arrived at the camp around 3pm to be pleasantly surprised by a picturesque location close to a river and good facilities (by that I mean access to hot shower and 5 minutes of free WiFi).
Day 2: Serón to Dickson

We initially thought that this was going to be our hardest day (only proved to be wrong on the last day) as we set off for a 19km hike. The path winded through mixed terrain encircling the Torres del Paine mountain range. The first third of the distance included a set of relatively steep climbing sections in the sun. We dealt with them well overtaking a few larger groups. However as soon as we turned around the mountain, we faced strong and ice-cold headwind which required us to put on more layers on the spot for another hour or so. Once we reached the halfway point at the Ranger booth, we entered relatively easy and level terrain all the way to Dickson. Unexpectedly its length and not the relative altitude made us even more tired than the initial climbing part. Nevertheless the final descent into the Dickson camp was a true cherry on top because of amazing views of one of the mountains overlooking the camp.
Day 3: Dickson to Los Perros

Day 3 can be treated as a preparation for the most strenuous part of the circle — crossing over the John Gardner Pass which is the highest point of the whole trail at 1200m. The hike begins with a very steep climb above the camp in the forest, but is later followed by a more gradual ascent along one of the rivers. It is mostly uphill however we ended up less tired than the day before for it was shorter. Towards the end of it, we were amazed by a great view of the Los Perros glacier right next to the camp. Unlucky as we were to arrive there during a down pour, the camp still offers magnificent views both towards Dickson and the Gardner Pass. Unfortunately the bad weather made us stay inside the kitchen area for most of the evening. Following rangers’ advice to leave by 7am we had an early night. Apparently the weather over the Pass is more stable in the morning.
Day 4: Los Perros to Paso

The next morning we had to prepare breakfast and pack tents in pitch black with headlights on. It certainly did not help that the cold drizzle never stopped. As soon as the sun started rising over the horizon, we set off for the Pass. Even though the trek led us initially through a medium-level forest ascent, we were slowed down significantly due to bad ground conditions following a full night of heavy rain. Most of the first half of the trek was covered in mud. It was actually quite dangerous for our ankles as most of the tree branches lying around were very slippery. As we crossed the trees level, the weather changed substantially. All of a sudden we had to wear all of our thermal and water/wind proof layers to face both heavy snow and strong Patagonian winds at the steepest part of the Pass. Hard external conditions and difficult terrain made it the most difficult part of our journey. As soon as we reached the top and started heading down, however, the wind calmed down allowing us to enjoy the views of a giant Grey glacier. Surprising as it sounds, I found the later descent onto the Paso camp more challenging than the climb itself. Going down on a very steep staircase was very hard on my knees as I essentially had to keep slowing myself down. Once we reached the camp we primarily focused on cooking our lunch/dinner while enjoying the glacier and recovering from a tiring and cold day. The camp did not have much to offer and was very small but it gave us a family-like feeling with other O hikers.
Day 5: Paso to Grey

Having crossed the Pass, we knew that we had two days of “rest”, i.e. of easier hikes to get over with. Grey camp is in a wonderful location right next to the place where glacier turns into Grey lake. Essentially we had to hike along the glacier for the whole day entering the camp just before the viewpoint overlooking the glacier-water touchpoint. The path has several bridges with magnificent views which may be a little scary to those with altitude sickness. A fun fact is that most of those did not exist up until a few years ago before a Swiss engineer proposed building them and shortening the overall trekking section substantially.
Day 6: Grey to Paine Grande

We continued on the path along the Grey lake gradually ascending onto higher and higher terrain and moving further inland. Even though it was a largely uneventful hike, it took us from a glacier scenery into a fjord-like area of the next camp with a great view of the Frances valley mountain range. A relatively short hike left us with plenty of time to go on an extra walk to the Lake Pehoe lookout. We hoped to get a good picture of the main mountain range of the park only to be disappointed by it being mostly covered in clouds preventing any great pics.
Day 7: Paine Grande to Italiano

The distance between Paine Grande and Italiano is only 7.5km (2.5h). Yet we aimed to set off early to leave plenty of time for visiting one of the two most popular spots in the park — Frances Valley and Britannica Mirador. We chose to stay at Italiano as it was most convenient to set up our tents and climb up the valley with no backpacks on while not having to backtrack much of the trail (as Los Cuernos and Frances Valley would require us to do). Following a quick lunch, we set off for a lightweight hike with all other W trail tourists in a great sunny weather. The route proved to be relatively steep but not having to carry the backpacks made a huge difference. Reaching the top, we ended up staying there for an hour taking naps in the sun and having snacks. Safe to say that the Frances Valley lookout fulfilled my expectations while the Britannica point was slightly less impressive (not to say it was not worthy the effort though).
Day 8: Italiano to Chileno

On the final full day we faced a conflicting choice between getting up early and doing a 30km hike all the way to the Torres Mirador, or taking it easier and getting to Chileno and leaving the final ascent for the last day. Hearing from fellow hikers that the early morning weather may be temperamental at the Mirador, we decided to take a chance and try to make it in one go. Leaving early also allowed us to keep both options open throughout the day. Slightly scared by the previous longest section between Serón and Dickson, the hike proved to be quite manageable probably due to us being in a much better shape. We managed to get to the final steep climb to Chileno around 1pm. It gave us plenty of time to reach the Mirador by 4pm as required by the rangers. With retrospect we were glad to have made that decision and finished the hike itself on the same day. It ended up being more strenuous than expected and, if it had not been for the adrenaline, we would have had trouble completing it on time. In the end we reached the top around 3.45pm and stayed on top of it for more than an hour snacking and taking pictures.
Alterations
During the trek, we met quite a few tourists who followed the same or very similar itineraries. In fact one of the best things about the O trail is that its capacity is very limited and after a day or so one is able to recognize everyone who started on the same day. This is true starting from Serón all the way to Los Perros where groups start to diverge. The reason why is that Paso is the smallest camp. It can accommodate roughly half the people from previous camps and thus needs to be skipped for those who tried to book it too late. The distances between Paso, Grey, and Paine Grande are also shorter allowing one to skip one of the camps and still finish in one albeit a long day. For example, skipping Paso results in an approximately 10 hours long hike.
At the time of booking 6 months ago, we were not aware of these potential problems and managed to book all the camps successfully with blissful ignorance. With retrospect, we could have skipped one of the camps without much physical strain at the expense of spending time outdoors. Yet a few slower days made for more relaxing overall experience which is what we went there for primarily.
Cost

From the very beginning we were decided to do the O trail and travel on budget. Taking the whole circuit essentially forced us to stay in tents since some of those camps do not have great facilities. We were also fine with cooking ourselves to avoid expensive hot meals available for advance purchase at some of the camps. The most luxurious option available on the full circuit is renting all the sleeping (bags, tents, etc) equipment and buying food at each camp thus lowering the overall weight of one’s backpack. The approximate cost of renting a sleeping bag and a tent daily is $50 while each meal would probably be around $20.
On the other hand, the W trail is much more accessible to more demanding tourists as there are plenty of so-called refugios offering beds and restaurant meals. They are also well connected with other means of transport allowing one to avoid hiking by taking boats between them.
Looking back at all the costs, the most expensive part of the trip was the flight ticket as camping permissions were very cheap. We also did not have to rent any hiking gear in Puerto Natales since we took most it from home.
Here is my expenses breakdown coming from NYC:
- Flight to Puntas Arenas booked 6 months in advance: $900
- High carb food for 8 nights (lunch snacks and hot dinners): $30
- Camp permits: $100
- Bus tickets between the airport and the park: $75
- Two nights stay in Puerto Natales before and after the hike: $50
- Restaurant meals in Puerto Natales: $80
This brings the grand total to approximately $1300 dominated by the flight cost, but it is in the ball park of costs of doing any other overseas trip from New York thanks to cheaper flights. Based on my experience, going to Asia or Europe may be a little cheaper however the difference is not as substantial as one would imagine. Quite often people also amortize the flight cost by spending more time in the area visiting El Calafate or Tierra Del Fuego.
Note that local adventure providers may charge up to $5000 for a guided, all-inclusive tour around Torres Del Paine on top of a flight ticket.
Extra notes
Quality of campsites

One of the main deterrents for others to join was the prospect of camping at locations of varying quality of facilities. Personally I followed the assumption that we would only have access to basic level of facilities needed to cook and stay overnight, i.e. lacking showering for most part. Yet the prospect of not having access to a hot shower for up to 9 days was a no go for a lot of people. Looking back it was a good assumption given that we were only able to take a hot shower at half the camps we stayed at (primarily on the W trek). It is worth noting that Paso, the worst equipped camp, did not even have access to a regular toilet although the view of the glacier from it was magnificent making staying there worthwhile.
Camps also differed in the level of cooking services provided. Only a half of them had an indoor kitchen which stimulated socializing and reading books in the evenings. Yet a few of them only had covered, outdoors cooking areas. They were satisfactory for preparing meals but forced everyone to have early nights for it was usually too cold to be outside.
Maps and distance signs
At the entrance to the park everyone is given a paper map of the park with all the major trails highlighted. It not only contains information such as distance between major POIs and time needed but also a graph of altitude versus distance of each route. At first it sounds like a good idea as it sets difficulty expectations accordingly, but over the whole trip we developed the impression that these were not entirely accurate. Their distance estimates seemed to be especially off. For example, the vertical section would often be over-represented in it compared to long and easy sections which followed it. Every once in a while we also encountered CONAF road signs with distances but they usually contradicted each other making them useless. Most of them also had visible alteration signs on them further reducing our trust in them.
Booking far in advance

A yet another major issue with planning the whole trip was the need to book all the campsites 6 months in advance due to its scarce capacity. Best times to visit Patagonia are fall and spring in the southern hemisphere which correspond to Oct-Nov and Feb-Mar. In fact we initially tried to book it for the Thanksgiving holiday but were way too late to the game in August. Most of the people I asked were unable to commit to such a long holiday and that far away in advance. Booking everyone at the same time ensured the whole group would share the same itinerary. For example, I tried to add one more person at the end of October but I had already been unable to extend the Paso reservation as it was already fully booked out.
Campsite booking process
In order to enter the O trail, one needs to present booking confirmations for all the camps to a park ranger. At first it does not sound unreasonable, however the whole process is actually harder than it sounds. All of 8 needed camps are owned by 3 different companies with each having a wildly different booking system. For one of them, Vertice Patagonia, I paid using PayPal but never received any confirmation email. Luckily their system worked and we were able to find the booking at each camp. If one books it well in advance there probably is not much need to worry, however camps fill out fast and there is always a risk of being able to secure only a subset of camp spots along one’s itinerary.